How to install the xPack prerequisites
Overview
All xPack core tools are Node.js CLI applications
available from the
npmjs.com public repository. They can be installed
via npm, which runs on top of Node.js.
Install Node.js & npm
The only prerequisite for xPack is a recent version of Node.js (>=20.0.0), as some dependencies require new features. Detailed instructions for each supported platform are provided in the following sections.
$ node --version
v20.18.0
If this is your first time using npm, you'll need to install the Node.js ECMAScript (JavaScript) runtime. The installation process is straightforward and does not clutter system locations. There are two versions of Node.js: LTS (Long Term Support) and Current. Generally, it is safer to use the LTS version, especially on Windows.
- Windows
- macOS
- GNU/Linux
For Windows, the general procedure is to download the package and run the setup as usual (see below for details).
The result is a binary program named node.exe,
that can be used to execute
JavaScript code from the terminal, and a stub named npm.cmd, executing
the npm-cli.js script, which is part of the Node.js module that implements
the npm functionality.
node setup
Download the Windows Prebuilt Installer from the Node.js
download
page (a node-v*-x64.msi file,
only x64 is supported) and run the Windows setup as usual,
with administrative rights.
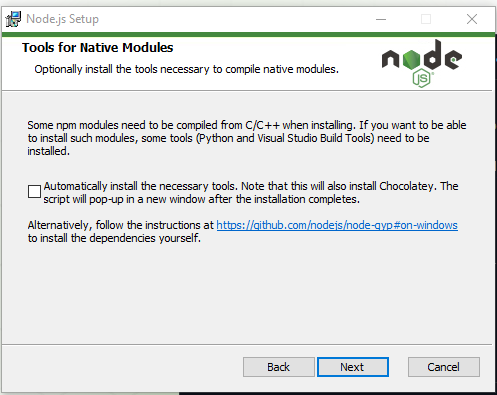
If you are not developing native modules, it's best to skip selecting the Tools for Native Modules during installation. This will help you avoid installing Visual Studio and other large packages that you don't need.
The setup process creates a folder, such as C:\Program Files\nodejs,
which is automatically added to the system path because it contains
the node.exe binary.
C:\>where node.exe
C:\Program Files\nodejs\node.exe
C:\>node --version
v20.18.0
npm update
Node.js comes bundled with a version of npm, which is typically slightly older.
C:\>where npm.cmd
C:\Program Files\nodejs\npm.cmd
C:\>npm --version
10.8.2
It is advisable to update it to the latest version:
C:\>npm install -location=global npm@latest
removed 1 package, and changed 60 packages in 5s

27 packages are looking for funding
  run `npm fund` for details
The next step is to check the version:
C:\>where npm.cmd
C:\>where npm.cmd
C:Program Files
odejs
pm.cmd
C:UsersilgAppDataRoaming
pm
pm.cmd
C:\>npm --version
10.9.0
What to do if the update is not effective?
Surprisingly, checking the version may reveal the old version:
C:\>where npm.cmd
C:\Program Files\nodejs\npm.cmd
C:\>npm --version
10.8.2
This happens because, by default, global Node.js packages on Windows
are installed in the user home folder, specifically in %APPDATA%\npm
(e.g., C:\Users\ilg\AppData\Roaming\npm). In older releases,
this path was not included
in the system or user path.
C:\>echo %Path%
If this is the case, it must be manually added before the current path:
C:\>set Path=%APPDATA%\npm;%Path%
To make this setting persistent, execute the following command:
C:\>setx Path "%APPDATA%\npm;%Path%"
Please note the syntax differences: setx does not use an equal
sign but uses double quotes, which can be problematic if used with set.
These commands are valid for the cmd.exe shell. For PowerShell or
other shells, please adjust the syntax accordingly.
After this, the new version of the program should be visible:
C:\>npm --version
10.9.0
Git
While not mandatory for using the xPack tools alone, it is recommended to install the Git for Windows package too.
This also installs a bash shell.
The xPack Core Tools can run in either the Windows shells or in the Git bash shell.
Visual C++ Redistributable Files
According to Microsoft, some libraries cannot be distributed with the xPack tools and must be installed separately.
For example, the msvcp140.dll and vcruntime140.dll files are part of the
Visual C++ Redistributable for Visual Studio.
Download the latest version of vc_redist.x64.exe and install it as usual.
The binaries in the xPack Meson Build package use vcruntime140.dll;
without these redistributables
installed, the meson command will fail.
PowerShell Execution Policies
Recent Windows versions use PowerShell, which has a more restrictive execution policy designed to prevent the execution of malicious scripts. Unfortunately, this also prevents the execution of some scripting applications, like Node.js or Python.
If you get a message in the console as the one below:
xpm : File C:\Users\...\AppData\Roaming\npm\xpm.ps1 cannot be loaded because running scripts is disabled on this system. For more information, see about_Execution_Policies at
https:/go.microsoft.com/fwlink/?LinkID=135170.
At line:1 char:1
+ xpm init --template @xpack/hello-world-template@latest --property lan ...
+ ~~~
    + CategoryInfo          : SecurityError: (:) [], PSSecurityException
    + FullyQualifiedErrorId : UnauthorizedAccess
The terminal process "C:\WINDOWS\System32\WindowsPowerShell\v1.0\powershell.exe -Command xpm init --template @xpack/hello-world-template@latest --property language
then run the following command in a PowerShell terminal:
Set-ExecutionPolicy -ExecutionPolicy Bypass -Scope CurrentUser
For more details please read the Microsoft about_Execution_Policies page.
Long file names
Due to historical reasons, Windows restricted file paths to a maximum length of 260 characters.
This can present challenges for projects created on other platforms, where lengthy file names are more commonplace.
On Windows 10 and newer versions, the Long Paths feature can be enabled manually. For further information, please refer to the Microsoft documentation, such as the page on Maximum Path Length Limitation.
Symbolic links
By design, xpm utilises symbolic links to folders (junction points on NTFS) to facilitate the sharing of common packages across projects. Any attempt to install packages on a drive that does not support symbolic links will result in an error:
error: volume X: does not support links, it might not be NTFS, or it might be a remote resource
Utilise a recent version of Windows and format the drive as NTFS.
For macOS, it is strongly recommended to use a version manager (see below).
The result is an executable named node,
which can be used to execute
JavaScript code from a shell, and a symbolic link named npm that points to
the npm-cli.js script. This script is part of the Node.js module that
provides the npm functionality.
Some tutorials mistakenly suggest installing Node.js with administrative
rights. While this isn't an issue for Node.js itself, it will require
administrative rights for using npm and xpm, which can lead to various
permission-related problems. To simplify maintenance, it is highly
recommended to install Node.js and npm in the home folder using a
version manager.
Quick instructions
If you're confident in what you're doing and prefer a shortcut, copy and paste the following script into a terminal. Otherwise, follow the steps one by one.
For security reasons, conscientious users should review the content of the file before executing it.
If you trust the script, you can use the following shortcut:
curl --fail --silent --show-error --location https://raw.githubusercontent.com/xpack/assets/master/scripts/install-nvm-node-npm-xpm.sh | ${SHELL}

export NVM_DIR="${HOME}/.nvm"
source "${NVM_DIR}/nvm.sh"
Otherwise download and check the script:
mkdir -pv "${HOME}/Downloads/"
curl --output "${HOME}/Downloads/install-nvm-node-npm-xpm.sh" https://raw.githubusercontent.com/xpack/assets/master/scripts/install-nvm-node-npm-xpm.sh
cat "${HOME}/Downloads/install-nvm-node-npm-xpm.sh"
When confident, run it:
bash "${HOME}/Downloads/install-nvm-node-npm-xpm.sh"

exit
This script will install nvm (the Node Version Manager), node,
npm and xpm.
To automatically activate nvm, the script adds several lines
to the shell initialization script. Therefore, it is necessary
to restart the shell to apply these changes or to manually
export NVM_DIR and source the script.
Command Line Tools
On macOS, the system C/C++ headers and most development tools are not included in the standard macOS distribution and need to be installed separately. Apple provides these tools as a separate Command Line Tools package.
If you followed the Quick instructions, the install-nvm-node-npm-xpm.sh
script already installed it. Otherwise,
to install the Command Line Tools only if they are not already in the
expected location, use:
if [ ! -d "/Library/Developer/CommandLineTools/" ]
then
  xcode-select --install
fi
Please note that although the C/C++ headers are also part of Xcode, their location is not fixed. Therefore, the Command Line Tools package must still be installed for the xPack toolchains to find them in the expected location.
Install nvm (node version manager)
If the install-nvm-node-npm-xpm.sh
script was successful,
the rest of this page is only informative and can be skipped.
Node.js can be installed manually, but for greater flexibility, on POSIX platforms, it is possible to automate this process by using nvm. This not only simplifies the installation procedure, but also allows advanced users to install multiple versions of Node.js in parallel. For details, see the Using a Version Manager to install Node.js and npm page.
In short, nvm changes the installation
location to ~/.nvm and allows multiple versions of node to be installed
in the ~/.nvm/versions/node folder.
If you have a previous version of npm installed with a local prefix, please remove it:
npm config delete prefix
sudo rm -rf /usr/local/lib/node-modules /usr/local/bin/node /usr/local/bin/npm /usr/local/bin/npm
rm -rf ~/Library/npm ~/opt/npm
Also remove ${HOME}/Library/npm/bin or ${HOME}/opt/npm/bin from the PATH.
When everything is clean, run the install script:
touch ~/.zshrc

curl -o- https://raw.githubusercontent.com/nvm-sh/nvm/master/install.sh | bash
This will install the version manager in ~/.nvm, and add a few lines to
the shell configuration file (.zshrc, which must be present).
Please note that nvm requires NVM_DIR to be set in the environment
and the nvm.sh script to be executed; without these, nvm will not
function.
To install the latest LTS version of Node.js (like 20), open a new terminal (to apply the new environment variables), and then run the following commands:
nvm install 20 --lts node
nvm use node 20
nvm install-latest-npm
nvm alias default 20
You can also execute the commands individually and verify the results, for example:
% nvm install 20 --lts node
Downloading and installing node v20.18.0...
Downloading https://nodejs.org/dist/v20.18.0/node-v20.18.0-darwin-x64.tar.xz...
######################################################################### 100.0%
Computing checksum with shasum -a 256
Checksums matched!
Now using node v20.18.0 (npm v10.8.2)

% nvm ls
       v18.20.4
->     v20.18.0
default -> node (-> v18.20.4)
iojs -> N/A (default)
unstable -> N/A (default)
node -> stable (-> v18.20.4) (default)
stable -> 22.11 (-> v18.20.4) (default)
lts/* -> lts/jod (-> v18.20.4)
lts/argon -> v4.9.1 (-> N/A)
lts/boron -> v6.17.1 (-> N/A)
lts/carbon -> v8.17.0 (-> N/A)
lts/dubnium -> v10.24.1 (-> N/A)
lts/erbium -> v12.22.12 (-> N/A)
lts/fermium -> v14.21.3 (-> N/A)
lts/gallium -> v16.20.2
lts/hydrogen -> v18.20.5 (-> N/A)
lts/iron -> v20.18.0
lts/jod -> v22.11.0

% nvm use node 20
Now using node v20.18.0 (npm v10.8.2)

% node --version
v20.18.0

% nvm install-latest-npm
Attempting to upgrade to the latest working version of npm...
* Installing latest `npm`; if this does not work on your node version, please report a bug!

changed 78 packages in 2s

25 packages are looking for funding
  run `npm fund` for details
* npm upgraded to: v10.9.0

% which npm
/Users/ilg/.nvm/versions/node/v20.18.0/bin/npm

% npm --version
10.9.0

% nvm alias default 20
default -> 20 (-> v20.18.0)
Please note that this will install the latest
LTS version; to install the very latest Current version, remove
the --lts option.
To explicitly install a previous version and to switch to it, use the same
commands, but replace 20 with your desired version (for example 18).
nvm install 18 --lts node
nvm use node 18
nvm install-latest-npm
nvm alias default 18
At any time, to switch between any of the installed versions, use:
nvm use <version>
nvm alias default <version>
For GNU/Linux, it is strongly recommended to use a version manager (see below).
The result is an executable named node,
which can be used to execute
JavaScript code from a shell, and a symbolic link named npm that points to
the npm-cli.js script. This script is part of the Node.js module that
provides the npm functionality.
Some tutorials mistakenly suggest installing Node.js with administrative
rights. While this isn't an issue for Node.js itself, it will require
administrative rights for using npm and xpm, which can lead to various
permission-related problems. To simplify maintenance, it is highly
recommended to install Node.js and npm in the home folder using a
version manager.
Quick instructions
If you're confident in what you're doing and prefer a shortcut, copy and paste the following script into a terminal. Otherwise, follow the steps one by one.
For security reasons, conscientious users should review the content of the file before executing it.
If you trust the script, you can use the following shortcut:
wget --quiet --output-document=- https://raw.githubusercontent.com/xpack/assets/master/scripts/install-nvm-node-npm-xpm.sh | ${SHELL}

export NVM_DIR="${HOME}/.nvm"
source "${NVM_DIR}/nvm.sh"
Otherwise download and check the script:
mkdir -pv "${HOME}/Downloads/"
wget --quiet --output-document="${HOME}/Downloads/install-nvm-node-npm-xpm.sh" https://raw.githubusercontent.com/xpack/assets/master/scripts/install-nvm-node-npm-xpm.sh
cat "${HOME}/Downloads/install-nvm-node-npm-xpm.sh"
When confident, run it:
bash "${HOME}/Downloads/install-nvm-node-npm-xpm.sh"

exit
This script will install nvm (the Node Version Manager), node,
npm and xpm.
To automatically activate nvm, the script adds several lines
to the shell initialization script. Therefore, it is necessary
to restart the shell to apply these changes or to manually
export NVM_DIR and source the script.
Arm platforms, like the Raspberry Pi, are supported, currently only in 64-bit mode.
Install nvm (node version manager)
If the install-nvm-node-npm-xpm.sh
script was successful,
the rest of this page is only informative and can be skipped.
Node.js can be installed manually, but for greater flexibility, on POSIX platforms, it is possible to automate this process by using nvm. This not only simplifies the installation procedure, but also allows advanced users to install multiple versions of Node.js in parallel. For details, see the Using a Version Manager to install Node.js and npm page.
In short, nvm changes the installation
location to ~/.nvm and allows multiple versions of node to be installed
in the ~/.nvm/versions/node folder.
If you have a previous version of npm installed with a local prefix, please remove it:
sudo rm -rf /usr/local/lib/nodejs
rm -rf ~/opt/npm
npm config delete prefix
Also remove ${HOME}/opt/npm/bin from the PATH.
When everything is clean, run the install script:
curl -o- https://raw.githubusercontent.com/nvm-sh/nvm/master/install.sh | bash
This will install the version manager in ~/.nvm, and add a few lines to
the shell profile, for example to .bash_profile on most
distributions.
Please note that nvm requires NVM_DIR to be set in the environment
and the nvm.sh script to be executed; without these, nvm will not
function.
To install the latest LTS version of Node.js (like 20), open a new terminal (to apply the new environment variables), and then run the following commands:
nvm install 20 --lts node
nvm use node 20
nvm install-latest-npm
nvm alias default 20
You can also execute the commands individually and verify the results, for example:
$ nvm install 20 --lts node
Downloading and installing node v20.18.0...
Downloading https://nodejs.org/dist/v20.18.0/node-v20.18.0-linux-arm64.tar.xz...
################################################################################################################### 100.0%
Computing checksum with sha256sum
Checksums matched!
Now using node v20.18.0 (npm v10.8.2)

$ nvm ls
       v18.20.5
->     v20.18.0
default -> 18 (-> v18.20.5)
iojs -> N/A (default)
unstable -> N/A (default)
node -> stable (-> v20.18.0) (default)
stable -> 20.18 (-> v20.18.0) (default)
lts/* -> lts/jod (-> N/A)
lts/argon -> v4.9.1 (-> N/A)
lts/boron -> v6.17.1 (-> N/A)
lts/carbon -> v8.17.0 (-> N/A)
lts/dubnium -> v10.24.1 (-> N/A)
lts/erbium -> v12.22.12 (-> N/A)
lts/fermium -> v14.21.3 (-> N/A)
lts/gallium -> v16.20.2 (-> N/A)
lts/hydrogen -> v18.20.5
lts/iron -> v20.18.0
lts/jod -> v22.11.0 (-> N/A)

$ nvm use node 20
Now using node v20.18.0 (npm v10.8.2)

$ node --version
v20.18.0

$ nvm install-latest-npm
Attempting to upgrade to the latest working version of npm...
* Installing latest `npm`; if this does not work on your node version, please report a bug!

changed 78 packages in 3s

25 packages are looking for funding
  run `npm fund` for details
* npm upgraded to: v10.9.0

$ which npm
/home/ilg/.nvm/versions/node/v20.18.0/bin/npm

$ npm --version
10.9.0

$ nvm alias default 20
default -> 20 (-> v20.18.0)
Please note that this will install the latest
LTS version; to install the very latest Current version, remove
the --lts option.
To explicitly install a previous version and to switch to it, use the same
commands, but replace 20 with your desired version (for example 18).
nvm install 18 --lts node
nvm use node 18
nvm install-latest-npm
nvm alias default 18
At any time, to switch between any of the installed versions, use:
nvm use <version>
nvm alias default <version>
These commands were tested with bash on
Ubuntu, Manjaro and Raspberry Pi OS; for other environments
they may need small adjustments.
git & curl
Although not a requirement for the node/npm/xpm tools themselves,
it is recommended to have these tools installed, especially git,
since all examples begin with cloning projects.
Install them according to your distribution specifics.
For example on Ubuntu and Debian-based distributions, use:
sudo apt-get install --yes git curl
The GCC development headers and libraries
While the node/npm/xpm tools themselves do not require it, if you use the xPack native toolchains for software development, including for running tests natively, you will need the system C/C++ headers and libraries.
The commands to install them are distribution specifics. For example on Ubuntu and Debian-based distributions, use:
sudo apt-get install --yes g++ libc6-dev libstdc++6
To compile 32-bit application on 64-bit Intel systems, the multilib package is necessary:
sudo apt-get install --yes g++-multilib
For some applications, the kernel headers are also necessary:
sudo apt-get install --yes linux-headers-generic
Install xpm
xpm is also a portable
Node.js command line application.
On macOS and GNU/Linux, if you followed the Quick instructions, it is already installed. Otherwise, to install it, follow the steps in the xpm install page.
If you're confident and prefer a shortcut, run the following command:
npm install -location=global xpm@latest
Clean-ups (node/npm/xpm)
- Windows
- macOS
- GNU/Linux
Should xpm no longer be required, you may undertake a thorough clean-up by removing the following folders:
%APPDATA%\Roaming\xPacks%APPDATA%\Local\Caches\xPacks
Should npm no longer be required, the following folders may be removed to ensure a thorough clean-up:
%APPDATA%\Roaming\npm%APPDATA%\Local\npm-cache
If installed as recommended through the setup process, node can be uninstalled using Microsoft-specific mechanisms.
Should xpm no longer be required, you may undertake a thorough clean-up by removing the following folders:
${HOME}/Library/xPacks${HOME}/Library/Caches/xPacks
Should npm no longer be required, the following folders may be removed to ensure a thorough clean-up:
$HOME/.nvm$HOME/.cache/node
Should xpm no longer be required, you may undertake a thorough clean-up by removing the following folders:
${HOME}/.local/xPacks${HOME}/.cache/xPacks
Should npm no longer be required, the following folders may be removed to ensure a thorough clean-up:
$HOME/.nvm$HOME/.npm
Miscellaneous
The official page explaining how to install npm in a custom folder is Resolving EACCES permissions errors when installing packages globally.
For less common platforms, you can install from unofficial builds, or to compile it from sources. For more details, see the Node.js downloads page.